Calibration ensures that your device is correctly sizing 3D scan data with the FaceID sensor. Some iOS devices have variation from the sensor due to variation in the focal length of the device.
Calibration will only need to be done once, upon initial setup, except following iOS updates or reinstalling the application. Each device needs to be calibrated separately.
STEP 1: CLEAR CALIBRATION & OPEN CALIBRATOR
From the main screen, click the three bar in the top left corner, select Clear Calibration.
Then, click the three bars again and select Enter Manual Calibration Number.
STEP 2: ENTER CALIBRATION NUMBER
Input the number from the table below that corresponds to your device. To look up your model on your device, go to Settings → General → About and find Model Name.
You’re now calibrated and ready to use the IOL TrueCast App! Please contact [email protected] if you have any issues.
Apple Device Model | Manual Calibration Value |
iPad Pro (11-inch) (4th generation) | -6.5 |
iPad Pro (12.9-inch) (4th generation) | 0.0 |
iPad Pro (12.9-inch) (5th generation) | -7.0 |
iPad Pro (12.9-inch) (6th generation) | -6.5 |
iPhone 12 | 0.0 |
iPhone 12 Pro | -0.5 |
iPhone 12 Pro Max | -0.5 |
iPhone 13 mini | -2.0 |
iPhone 13 (all other models) | -6.5 |
iPhone 14 (all models) | -2.0 |
iPhone 15 (all models) | -2.0 |
———————-
Legacy Calibration Instructions (version 1.0 & 2.0)
Follow these instructions to calibrate your iPad or iPhone. Calibration ensures that your device is correctly sizing 3D scan data with the FaceID sensor. Some iOs devices have variation in the measurement data from the sensor due to variation in the focal length of the device. This is especially important when using an iPad Pro device.
General
Clicking the three lines in the top left corner will show a menu where you can access “Calibration”.
Calibration will only need to be done once, upon initial setup, except following iOS updates or reinstalling the application. Each device you are using will need to be calibrated separately.
Once the calibration data is set you can check “Calibration Data”.
Setup
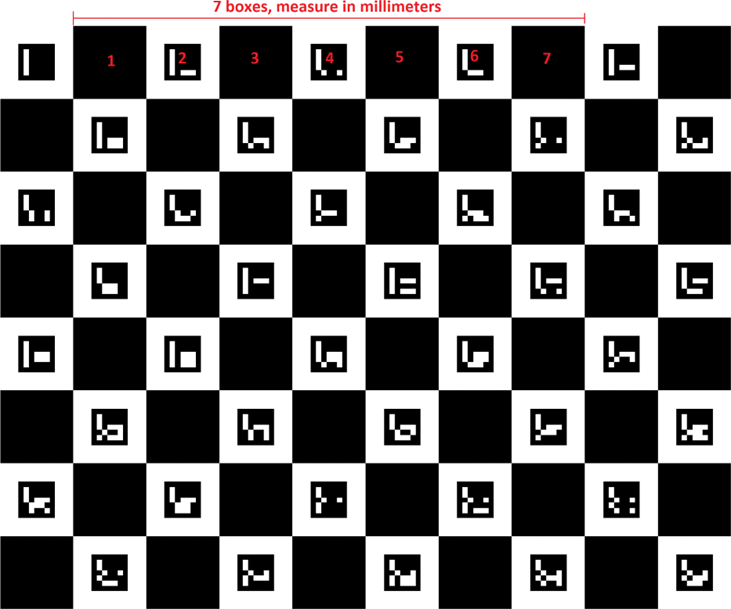
Download the calibration pattern, and measure the distance between 7 black boxes (corner to corner) in millimeters. You can print the pattern or display the pattern on a computer screen. There are three options:
- Letter (Standard 8.5”/11”): Download here
- 7 boxes printed 1:1 from letter PDF should be about 168 mm
- Use a screen and measure 7 boxes
If printing, ensure that the Scale in the Print Settings are set to Default, so that the printer does not automatically scale the size of the image
You will be recording this pattern with the front camera of your device (FaceID sensor + camera).
While recording, move slowly and keep the whole paper/calibration pattern visible in the preview screen.
Calibration Measurement Example
*Not to scale – use downloadable PDFs for printout
Calibration
(Video Tutorial Available at https://www.youtube.com/watch?v=sPauRDbHlpY)
1. Enter “Calibration”
2. Read the pop up and “Proceed.” Device will move to landscape mode
- Please use the device in landscape mode and the calibration board also in the landscape mode
3. Checker Width (mm) should be set to the width of the 7 boxes
- With an A4 paper it is around 163 mm
- With a Letter paper it is around 168 mm
- Computer screen depends on your screen and scaling, the whole image should be visible to record
4. Face the pattern with your device
- Fit the whole pattern to the preview screen (the whole calibration pattern should be visible in the preview)
5. Calibration process will start with the “Start” button
- Slowly move so that the pattern is visible in the preview
- The whole paper/pattern should be visible while recording
- Calibration will take 40 images in 16 seconds
- You should slowly move side to side and slightly up and down within the time the images are taken
6. Once the calibration process is complete the images are uploaded to the calibration server and calibration data is sent back to the device
- Check the calibration data from the menu item “Calibration Data” You can overwrite the data by doing the calibration again at any time.
Technical Support
Please contact [email protected] if you have any issues.